ハトネコエ Web がくしゅうちょう

プログラミングやサーバー・Web制作、チームマネジメントなど得た技術のまとめ

macOS Sierra で mysql2 の bundle install に失敗する場合

Rails のプロジェクトを扱っていて、
gem を bundle install していたところ mysql2 の部分でこんなエラーが…

Installing mysql2 0.4.4 with native extensions

Gem::Ext::BuildError: ERROR: Failed to build gem native extension.

    current directory: /Users/user_name/Programs/web/test-repo/vendor/bundle/ruby/2.3.0/gems/mysql2-0.4.4/ext/mysql2
/Users/user_name/.rbenv/versions/2.3.1/bin/ruby -r ./siteconf20161031-6252-1pfzkzr.rb extconf.rb
checking for ruby/thread.h... yes
checking for rb_thread_call_without_gvl() in ruby/thread.h... yes
checking for rb_thread_blocking_region()... no
checking for rb_wait_for_single_fd()... yes
checking for rb_hash_dup()... yes
checking for rb_intern3()... yes
-----
Using mysql_config at /usr/local/bin/mysql_config
-----
checking for mysql.h... yes
checking for errmsg.h... yes
checking for mysqld_error.h... yes
-----
Don't know how to set rpath on your system, if MySQL libraries are not in path mysql2 may not load
-----
-----
Setting libpath to /usr/local/Cellar/mysql/5.7.16/lib
-----
creating Makefile

To see why this extension failed to compile, please check the mkmf.log which can be found here:

  /Users/user_name/Programs/web/test-repo/vendor/bundle/ruby/2.3.0/extensions/x86_64-darwin-15/2.3.0-static/mysql2-0.4.4/mkmf.log

current directory: /Users/user_name/Programs/web/test-repo/vendor/bundle/ruby/2.3.0/gems/mysql2-0.4.4/ext/mysql2
make "DESTDIR=" clean

current directory: /Users/user_name/Programs/web/test-repo/vendor/bundle/ruby/2.3.0/gems/mysql2-0.4.4/ext/mysql2
make "DESTDIR="
compiling client.c
compiling infile.c
compiling mysql2_ext.c
compiling result.c
compiling statement.c
linking shared-object mysql2/mysql2.bundle
ld: library not found for -lssl
clang: error: linker command failed with exit code 1 (use -v to see invocation)
make: *** [mysql2.bundle] Error 1

make failed, exit code 2

Gem files will remain installed in /Users/user_name/Programs/web/test-repo/vendor/bundle/ruby/2.3.0/gems/mysql2-0.4.4 for inspection.
Results logged to /Users/user_name/Programs/web/test-repo/vendor/bundle/ruby/2.3.0/extensions/x86_64-darwin-15/2.3.0-static/mysql2-0.4.4/gem_make.out

An error occurred while installing mysql2 (0.4.4), and Bundler cannot continue.
Make sure that `gem install mysql2 -v '0.4.4'` succeeds before bundling.

で、 gem install mysql2 -v '0.4.4' を試したらそれは正常に実行できるので困った。

エラーメッセージの途中に library not found for -lssl と書かれていることから
openssl のライブラリ周りで問題が起きているのはわかるのですが、openssl を再インストールしたところで状況は変わらず
なかなか困っていました。

解決法1

ここの記事が解決してくれました : RailsプロジェクトでMySQLがbundle installできなかった - Qiita

この記事に書かれているコマンドと少し異なるのですが、

bundle config build.mysql2 --with-opt-lib=/usr/local/opt/openssl/lib --with-opt-include=-I/usr/local/opt/openssl/include

で解消できました。

なお、bundler のグルーバル設定を変えたくない場合は --local のオプションを上記コマンドに付けるといいです。

解決法2(こっちのが良さそう)

違うやり方として、この記事 : Pry起動時にエラーが出る場合の対処法 - Qiita
を参考に、

CONFIGURE_OPTS="--with-readline-dir=/usr/local/opt --with-openssl-dir=/usr/local/opt" rbenv install 2.3.1

と、openssl のディレクトリを明示した上で Rubyコンパイルをおこなった上で…という方法でもいけました。

解決法3(追記:2017/1/25)

コメントでいただきました。
現在は xcode-select --install でも対応できるようです。

最新の Xcode Command Line Tools では、この問題に対応しているんでしょうね。
というわけで、App StoreXcode の最新版をインストールしたのち

xcode-select --install

を実行してみてください。
(追記ここまで)


ついでに nokogiri も gem install に失敗してたけど、そちらはこの記事で助かりました。 : OSX への nokogiri 1.6.8.rc3 の install でハマったメモ - Qiita

たしかに以前 brew doctor で指摘されてるから unlink した覚えがある。
ってことで、

brew link --force libxml2

したあとに gem install nokogiri -- --use-system-libraries でインストール可能。
bundle config の方は以下のように設定。

bundle config build.nokogiri --use-system-libraries

これで mysql2 や nokogiri が Gemfile に含まれていても bundle install に成功するようになりました。
めでたしめでたし
npm と yarn のインストール時間を比較してみた

彗星の如く現れた yarn
Facebook社の中の人が作った yarn は、 npm を発展させたパッケージ管理ツールです。*1

npm 同様 package.json を読み込み、npm リポジトリとほぼ同様の yarn リポジトリからダウンロードしてくるものなので、
npm からの移行は簡単です。

まずは

brew install yarn

もしくは

npm install -g yarn

にて yarn をインストールしてきて、( npm に取って代わるものとして作られているため、前者のやり方を yarn としては推奨しているようだ)
それから現在の node_modules フォルダを削除し、

rm -rf node_modules

yarn install を実行するだけです。( yarn install とコマンドしても yarn とコマンドしても同じ )

yarn

さて、気になるのは yarn install にかかる時間。
本当に速くなっているのでしょうか?
time コマンドを利用し見てみましょう。

今回インストールするパッケージの一覧は以下のとおりです。

# package.json より抜粋
  "dependencies": {
    "font-awesome": "^4.7.0",
    "zepto": "^1.2.0"
  },
  "devDependencies": {
    "babel-preset-es2015": "^6.18.0",
    "csso": "^2.3.0",
    "del": "^2.2.2",
    "gulp": "^3.9.1",
    "gulp-babel": "^6.1.2",
    "gulp-htmlmin": "^3.0.0",
    "gulp-imagemin": "^3.1.0",
    "gulp-postcss": "^6.2.0",
    "gulp-pug": "^3.1.0",
    "gulp-replace": "^0.5.4",
    "gulp-sass": "^2.3.2",
    "gulp-sourcemaps": "^2.2.0",
    "gulp-uglify": "^2.0.0",
    "gulp-webserver": "^0.9.1",
    "postcss-cssnext": "^2.8.0",
    "postcss-csso": "^1.1.2",
    "pump": "^1.0.1"
  }

また、
npm のバージョンは v3.10.8
yarn のバージョンは v0.16.1 を使用しています。

time npm install

# 中略

npm install  35.38s user 10.38s system 51% cpu 1:29.60 total

約1分30秒かかりました。続いて yarn です。

time yarn

yarn install v0.16.1
info No lockfile found.
[1/4] 🔍  Resolving packages...
warning gulp > vinyl-fs > glob-stream > minimatch@2.0.10: Please update to minimatch 3.0.2 or higher to avoid a RegExp DoS issue
warning gulp > vinyl-fs > glob-watcher > gaze > globule > minimatch@0.2.14: Please update to minimatch 3.0.2 or higher to avoid a RegExp DoS issue
warning gulp > vinyl-fs > glob-watcher > gaze > globule > glob > graceful-fs@1.2.3: graceful-fs v3.0.0 and before will fail on node releases >= v7.0. Please update to graceful-fs@^4.0.0 as soon as possible. Use 'npm ls graceful-fs' to find it in the tree.
[2/4] 🚚  Fetching packages...
[3/4] 🔗  Linking dependencies...
[4/4] 📃  Building fresh packages...
success Saved lockfile.
✨  Done in 80.57s.
yarn  25.27s user 13.88s system 48% cpu 1:21.12 total

約1分20秒です。少し速いですね。
それから、行数のすごく長い npm install と違い、絵文字を使いつつシンプルに出力されているのが見て取れますね。

そしてここからが yarn の本領発揮です。

yarn は一度インストールしたものはキャッシュに貯め、
次回インストール時はキャッシュにあるものを使い、リポジトリからダウンロードしません。

それにより、インストール時間を大幅に削減しているのです。
再びインストールしてみましょう。

rm -rf node_modules
time yarn
yarn install v0.16.1
[1/4] 🔍  Resolving packages...
[2/4] 🚚  Fetching packages...
[3/4] 🔗  Linking dependencies...
[4/4] 📃  Building fresh packages...
success Saved lockfile.
✨  Done in 23.81s.
yarn  13.32s user 8.05s system 88% cpu 24.253 total

約24秒です!
従来の npm install と1分以上の違いがあります。

また、キャッシュにあるものを持ってきているだけなので、
ネットにつなげていない状況でも yarn コマンドは上のとおりに動作します。

まあ、問題は……

du -sh ~/.yarn-cache
 86M    /Users/user_name/.yarn-cache

ユーザーディレクトリに作られる yarn のキャッシュフォルダの容量がどんどんと大きくなっていきそうなのが心配ですね……。

はじめて Docker を使ったので使い方メモ

wercker で使うために Docker を初めて使ってみました。

参考にしたサイト :
今更始めるDocker on Mac、今更覚えるDockerコマンド - 病みつきエンジニアブログ
Docker Machineの作成

1. Docker Toolbox をインストール

brew install Caskroom/cask/docker-toolbox

Docker Toolbox をインストール。

brew install docker ではなく、上記の全部入りパッケージをインストールするのが良さそう。

これで docker コマンドであれこれ出来るようになるのかと思いきや、
このままではまだ Cannot connect to the Docker daemon. Is the docker daemon running on this host? というエラーメッセージが出るだけですので、
まずは仮想環境の設定から始めます。

2. docker コマンドが使えるようになるまで

docker-machine create --driver virtualbox docker-linux

今回は docker-linux という名前のマシン名にしましたが、ここはお好きなように。
VirtualBoxのマシン名一覧がカオスにならないよう docker-*** みたいな名前つけるのがおすすめかな)

docker-machine start docker-linux

これで仮想環境が起動されました。

起動された仮想環境の設定を見ます。

docker-machine env docker-linux

私の環境では以下のように出力されました。

export DOCKER_TLS_VERIFY="1"
export DOCKER_HOST="tcp://192.168.99.100:2376"
export DOCKER_CERT_PATH="/Users/nekonenene/.docker/machine/machines/docker-linux"
export DOCKER_MACHINE_NAME="docker-linux"
# Run this command to configure your shell:
# eval $(docker-machine env docker-linux)

言われたように

eval $(docker-machine env docker-linux)

コマンドを実行し、環境変数を設定してあげます。

これで docker コマンドは動くようになったはずですから

docker images

とコマンドを打ってみます。
今は何も Docker イメージをダウンロードしていないので、以下の1行だけが表示されます。

REPOSITORY   TAG       IMAGE ID      CREATED       SIZE  

3. Docker へのログイン

Docker のアカウントを取得したら、docker login コマンドでログインします。
これをしないと docker pull などがおこなえません。

docker login

ユーザーネームとパスワードが聞かれますので、登録通りに入力します。

ログイン作業が完了したら、

docker run -it hello-world

で、動作確認用の Docker イメージをダウンロードし実行してみます。

しばらく待ち、(自動的に docker pull hello-world:latest がおこなわれたのち)

Hello from Docker!
This message shows that your installation appears to be working correctly.

とメッセージが出てきて成功です。

docker images

とコマンドを打つと、以下のように Docker イメージがダウンロードされたことが確認できます。

REPOSITORY   TAG       IMAGE ID      CREATED       SIZE  
hello-world  latest    c54a2cc56cbb  7 weeks ago   1.848 kB

4. Ubuntu trusty を入れてみる

Docker Hub には、さまざまな Docker イメージがあります。
あなたが Docker Cloud にパブリックで置いたものも、自動的にここで公開されています。

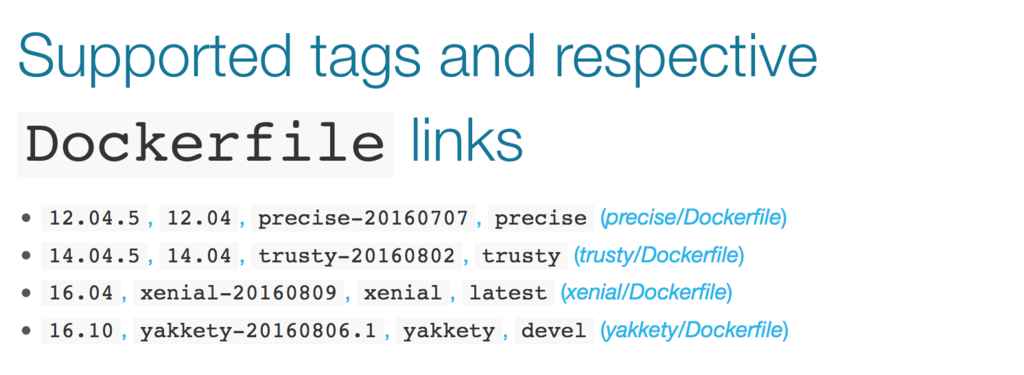
さて、今回は Ubuntu の公式リポジトリ を見てみましょう。

f:id:nekonenene:20160823044439p:plain

ここに書かれている 14.04trustylatest などはすべてタグの名前です。

docker pull の際、リポジトリ名だけでなくタグ名も指定できます。
ですから、Ubuntutrusty タグの Docker イメージを入れて実行する際は、

docker run -it ubuntu:trusty

とコマンドを打ちます。

これは docker run -it ubuntu:14.04 とコマンドを打つ場合と同じだと、
上の写真からわかりますね。

5. Docker イメージの削除

いろいろ入れたあとで docker images を打ってみます。

REPOSITORY     TAG     IMAGE ID      CREATED       SIZE
node           latest  800da22d0e7b  6 days ago    651.4 MB
ubuntu         latest  f8d79ba03c00  11 days ago   126.4 MB
ubuntu         trusty  ff6011336327  11 days ago   188 MB
hello-world    latest  c54a2cc56cbb  7 weeks ago   1.848 kB

このなかの node:latest と ubuntu:latest を削除したくなったとします。

そのときは docker rmi コマンドを使います。

docker rmi -f 800da22d0e7b f8d79ba03c00

そのときに IMAGE ID を使うのですが、
実はこれは完全に記述する必要はありません。

一意に定まるのであれば

docker rmi -f 800 f8d

のようにコマンドしてもしっかり消えてくれます。

6. Dockerfile からのビルド

Dockerfile は例えば以下のように書きます。

文字コードの設定方法に関して、こちら↓の記事にお世話になりました。
Docker: コンテナのlocaleを設定したい

で、こう作った Dockerfile からイメージを作成するコマンドは、例えば以下のような感じ。

この Dockerfile が現在いるディレクトリから見て、config というフォルダの下に入っている場合、

docker build -t my-docker-image-name:v1.0 ./config

ここで気を付けるのが、指定するのは ./config/Dockerfile と、Dockerfile のファイル名まででなく、Dockerfile があるディレクトリ名までを書くことです。

ファイル名まで書いてしまうと
unable to prepare context: context must be a directory: とエラーメッセージが出て怒られます。

それから、ビルドが始まるまではけっこう時間がかかりますのでその点もお気をつけて。
何も表示が出ないから動いてないんじゃないかと心配になりますが、1分くらい待つと表示が始まります。